![]()
© 2018 TrueLook Inc. All rights reserved.
102 West 3rd Street, Suite 725
Winston-Salem, NC 27101
Email: info@truelook.com
Toll Free: 833.878.3566, option 1
Email: support@truelook.com
Toll Free: 833.878.3566, option 2
Getting Started
01. Quick Overview
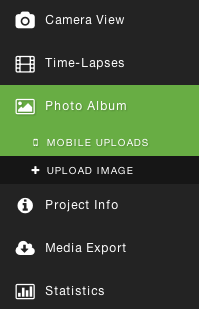
The TrueLook interface can be broken down into 3 main sections. The Global Header, the Project Menu, and then the main application area.
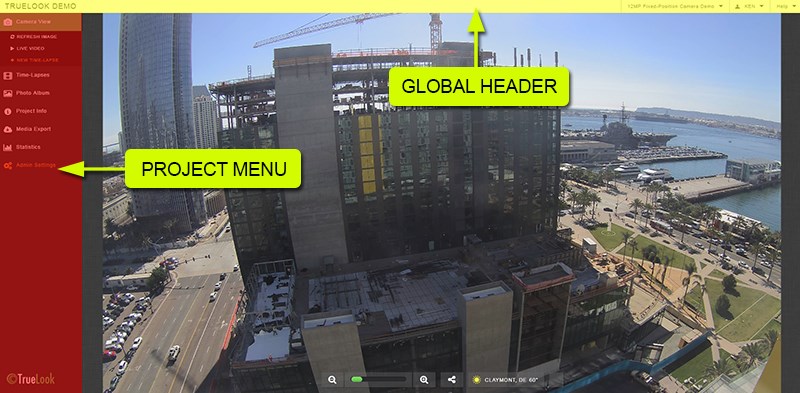
The Global Header holds menu items that are not specific to any project. This header remains (essentially) the same even as you switch between different projects or access other pages.
The Project Menu holds menu items that ARE specific to the currently selected project. Any camera controls, photo albums, time-lapse videos, etc. that are accessed within this menu are solely from the selected project. Items in this menu can be quite different, depending on which project you are viewing and your user-level.
The remaining application area will change depending on which item you select from the Project Menu. It will default to your live camera view, if the project has an active live camera.
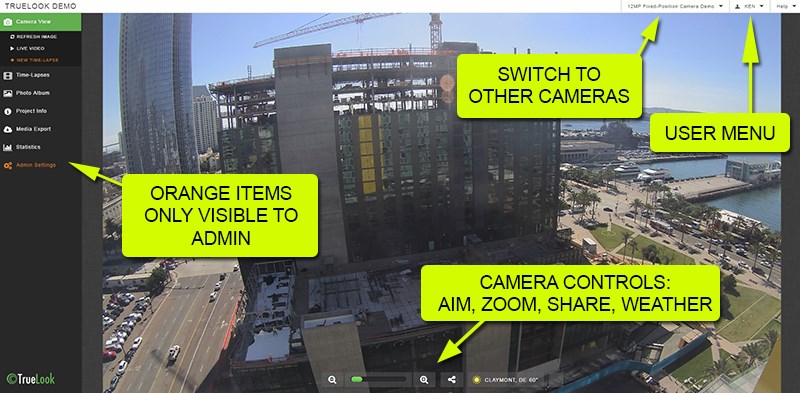
If you are an admin, you will see certain items in orange. These items cannot be seen by your non-admin users. They allow you change your settings, moderate albums & presets, schedule & edit time-lapses, and more.
02. The Project Dashboard
TrueLook users with multiple projects will have access to the Project Dashboard. Completed projects are also displayed, so you may see multiple projects listed even if you've only used a single camera from project to project. This gives you a quick way to access all your current and past project data, with an overview of your usage stats. A dropdown menu in the top right of the header will also let you quickly jump to any other project at any time.
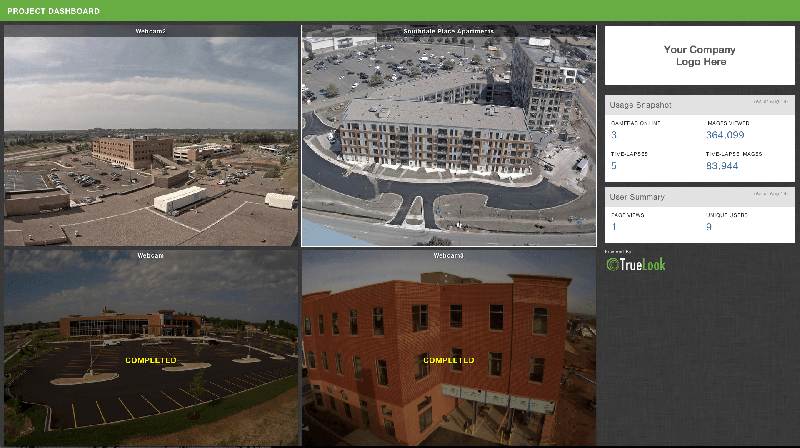
Users only have access to the projects they are assigned to. If a user is given access to only one project/camera, they will not be able to access the dashboard or the dropdown list of other projects. The admin has complete control over which projects each user can access.
03. Types of Users
There are four distinct user access levels, each with varying privileges. This lets the camera owner control the privacy of their data. Admins can assign one of these access levels to each new user they create. A project can also be accessed directly via URL without a username or password. The admin controls what access level these direct links function as.
The four access levels are Admins, Team Members, Viewers, and Limited Viewers. Each level adds new privileges to the one below it:
- Limited Viewers cannot view the live camera. They can only see descriptive project info and watch time-lapses.
- Viewers can also view and control the camera (minus the ability to view live video).
- Team Members have the ability to stream video, view statistics on camera usage, and to export media files from the project.
- Admins get many new tools and can schedule time-lapses, moderate albums, moderate users, and more.
Live Cameras
04. Aiming & Zooming The Camera
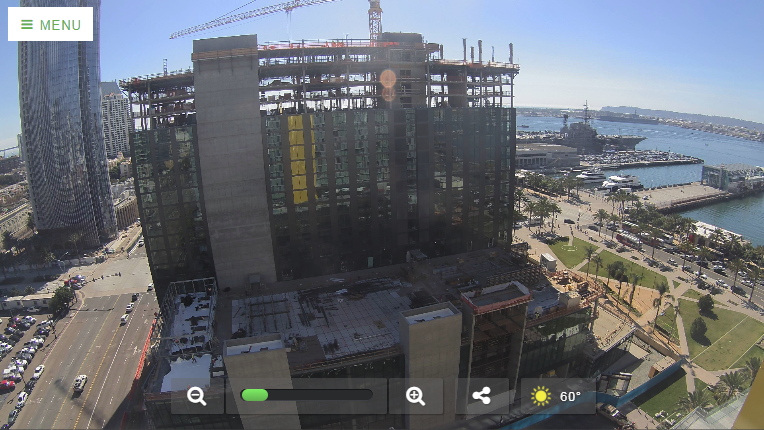
In the live camera view, you will see a semi-transparent control panel with basic camera navigation controls (on smaller displays, this control panel is displayed at the bottom of the screen). You can also control the camera with just your mouse, if you wish. The controls and behaviors differ somewhat between the two camera types, Fixed-Position and PTZ.

Fixed-Position Cameras use digital zooming. This process can be thought of as stretching the image to enlarge it. The camera itself does not move or capture new pictures when you zoom in and out. To control the zoom level, you can:
- Use the zoom slider by dragging the handle left or right
- Click the zoom in or zoom out buttons
- Scroll with your mousewheel while your cursor is over the image (fastest)
Once you have zoomed in, just click-hold-drag the image to drag it around.
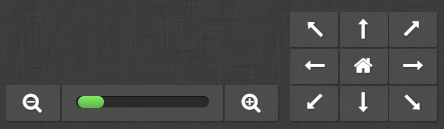
PTZ (Pan-Tilt-Zoom) Cameras physically move to capture new pictures anytime you zoom or direct the camera. This means your images will look sharp and detailed no matter how far in you zoom, but it also means the camera has to spend time uploading new images as you navigate. To control the zoom level:
- Use the zoom slider by dragging the handle left or right
- Click the zoom in or zoom out buttons
- Click and drag a box anywhere on your image, and the camera will zoom to the selection
PTZ cameras can also move up/down/left/right. To aim a PTZ camera:
- Use the arrow buttons in the control panel. The "Home" button will return you to your starting position and zoom level.
- Single click anywhere on the image, and the camera will center itself where you clicked. E.g. click the left edge to move the camera left.
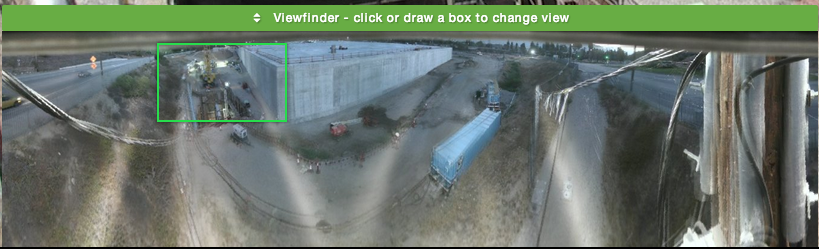
PTZ cameras also have a "Viewfinder" that shows what area you are currently viewing. You can use any of your mouse controls (click-drag or single-click) within the viewfinder as well, and this is the fastest way to move the camera large distances.
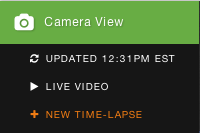
05. Fetching A New Live Image
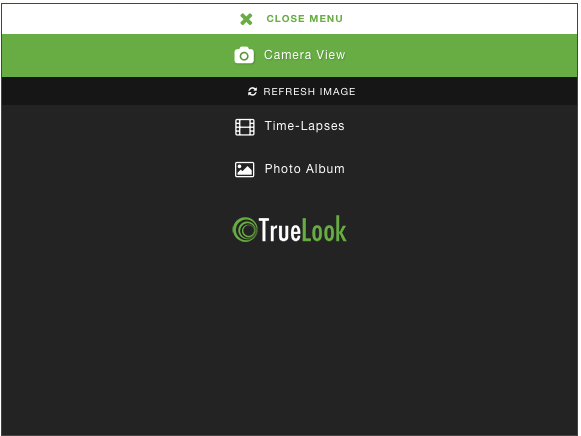
Sometimes the TrueLook interface will provide you with a cached camera image, rather than fetching a new live image. The cached image will only be a few moments old, but allows the interface to work much faster for the user. You can always request a new live image. While in the "Camera View" mode, simply click the "Refresh" button to fetch a new live image. Also, any action that moves or zooms a PTZ camera will fetch a new live image.

06. Live Video Feed
If live video is enabled on the camera, the "Live Video" menu button will be available from the submenu beneath "Camera View". When live video is enabled, the camera will continuously capture and display lower resolution images as fast as the data connection allows. You can continue to aim, zoom, and use PTZ presets during live video.
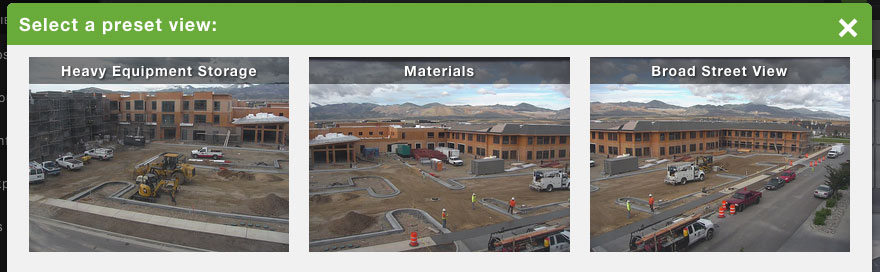
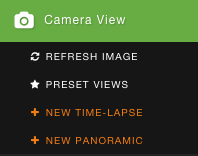
07. Preset Views (PTZ Only)
Preset Views provide a quick way to aim and zoom a PTZ camera to a location of interest. Click the "Preset Views" button in the submenu beneath "Camera View" to see any saved presets. Simply click a preset and the camera will move itself to the proper coordinates.
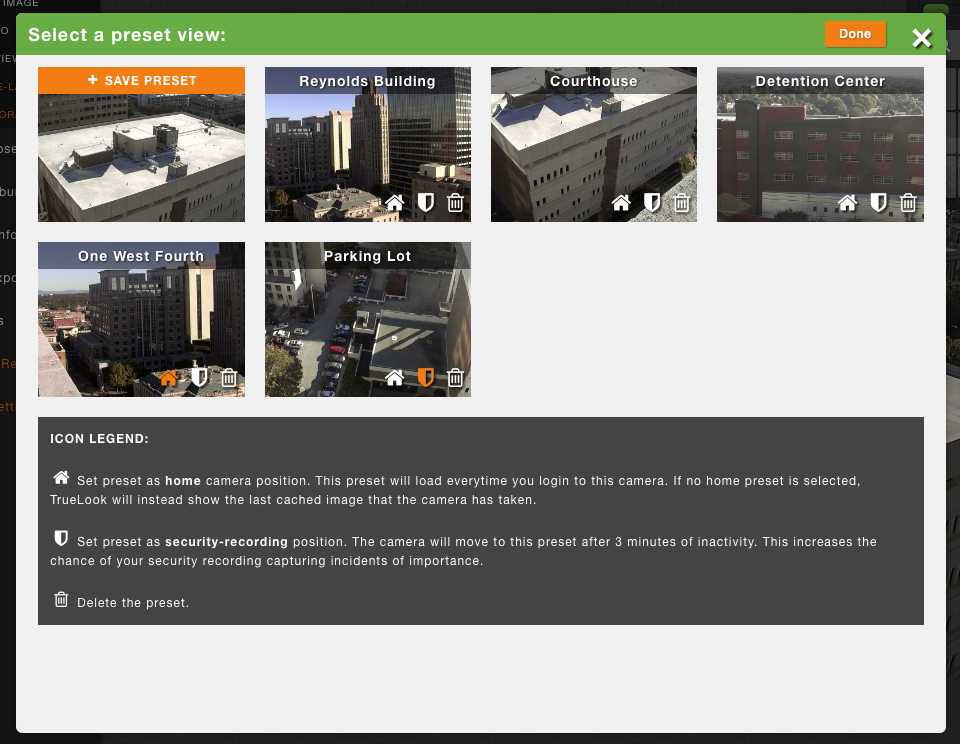
Admins will have a "Moderate" option that allows them to create and delete presets. The "+ SAVE PRESET" button will create a new preset at the camera's current view coordinates. The trash can icon can be clicked to remove a preset from your list.
While moderating the presets, an Admin can also set two special preset locations. A "home" and "shield" icon on each preset will let you define these. When active, the preset's icon will be highlighted orange.
Clicking the home icon on a preset will assign that view as the home position. Anytime a user logs into the camera, this preset will automatically load and will be the first thing the user sees. If no home position is assigned, a new user will instead see whatever happens to be the last image taken from the camera.
Clicking the shield icon will assign a security-recording position. When the camera is not busy with other tasks, it will aim itself at this location. This will ensure that your 24/7 security recording feature is recording high-priority areas whenever possible.
Offline Cameras
08. Completed Projects
Completed projects are still listed in the dashboard and other project menus. Opening a completed project will let you access the photo albums, time-lapses, and other media from that project, even though there is no longer a live camera associated with it.
09. Failure To Connect
If TrueLook cannot reach the camera, you will see a message explaining the issue. The problem usually self-corrects with a quick retry. See Troubleshooting Connection Failures for more info.
Share & Save
10. Save & Share Images
You have the option to save or share any image viewed in TrueLook. The "Save/Share" button will appear with the image navigation controls.
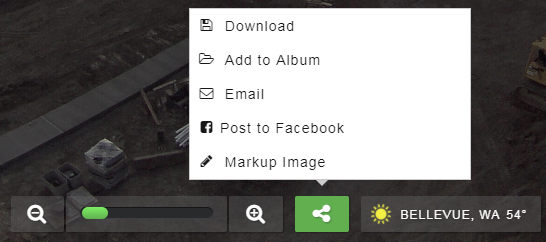
11. Download An Image
Select Download to save the currently displayed image to your computer. If on a mobile device, you will need to long-press on the image to save it to your device.
12. Save To Photo Album
Select Add to Album to save this image and any optional comments into your online TrueLook photo album.
13. Send Image Via Email
Select Email to share this image with others. Enter your info and message and TrueLook will deliver an email with the image attached.
14. Post Image To Facebook
Selecting this will option will allow you to post the current image to your Facebook timeline.
Time-Lapses
15. Watch Time-Lapse Videos
From the Project Menu on the left, select "Time-Lapses". All active, paused, and completed time-lapses will be listed with before and after thumbnails.
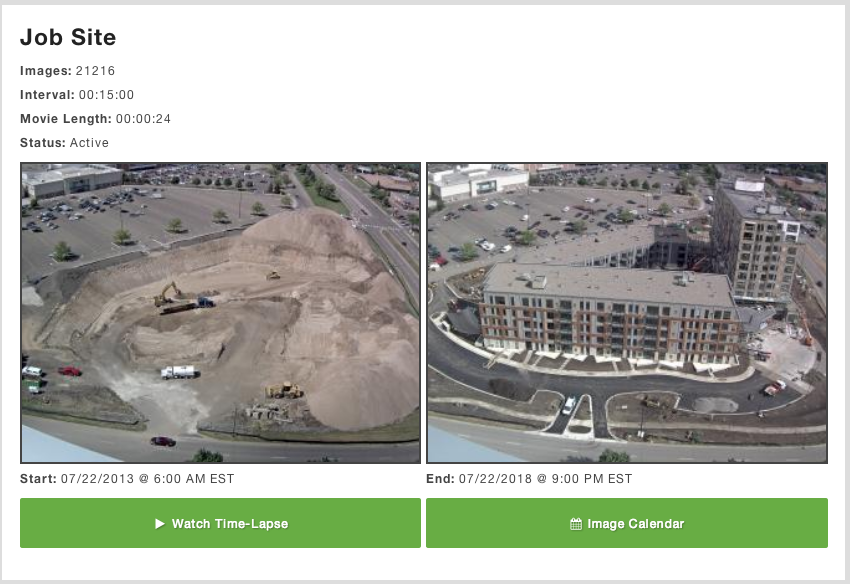
To watch a time-lapse video, simply click the "Watch Time-Lapse" button.
16. The Image Calendar
You can access a time-lapse's individual images using the Image Calendar. This lets you search images by date and time to see a precise camera shot. Click the "Image Calendar" button to begin browsing images from the selected time-lapse. A new menu will appear that allows you to select your desired date and time. You can also "autoplay" through the images in a slideshow. Quickly jump to any other time-lapses using the dropdown in the top-right.

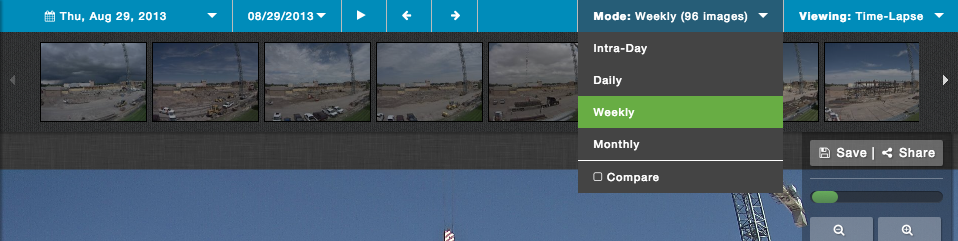
17. Daily, Weekly, Monthly Progress
By default, the image calendar will show you every image from your time-lapses. You can also change the image calendar and thumbnails to only show one image per day, week, or month. This allows for a broader overall view of your project progress, and lets your browse your time-lapse photos at larger time intervals. To change this setting, use the "Mode" dropdown menu in the upper-right.
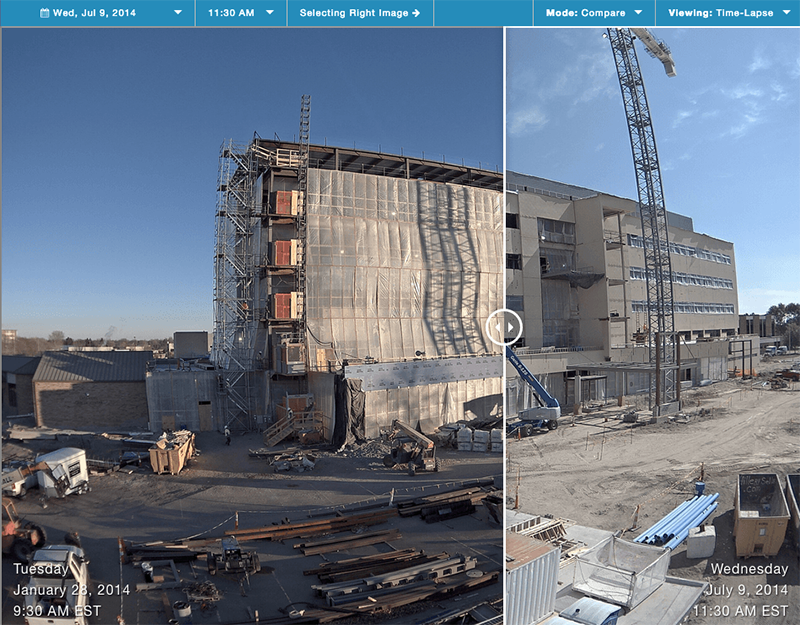
18. Compare Two Images
Under the "Mode" dropdown menu, there is a "Compare (as overlay)" feature toggle. Turning on "Compare (as overlay)" lets you overlay two time-lapse images from different dates in order to view your project progress. You will be able to select a left and right image by date and time. Dragging the center handle will control the viewable area of the images. To change the date and time of either image, you may click on the image you wish to change. Then use the date and time picker in the menu bar.
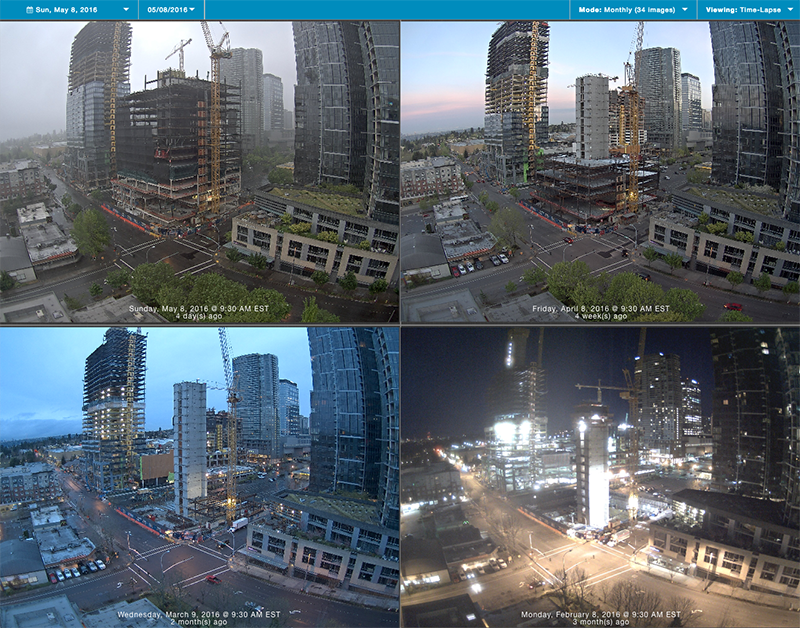
19. Compare Four Images
Under the "Mode" dropdown menu, there is a "Compare (quad-view)" feature toggle. Turning on "Compare (quad-view)" lets you view four time-lapse images from different times in a quadrant view. You can switch between intra-day, daily, weekly, or monthly intervals using the "Mode" dropdown menu.
20. Scheduling New Time-Lapses
Admins can schedule new time-lapses at any time. Ensure you are in the "Camera View" and you will see "+ NEW TIME-LAPSE" listed in the submenu.
For Fixed-Position cameras, simple click this button to begin scheduling your new time-lapse. For PTZ cameras, you must aim and zoom the camera to your desired coordinates for the time-lapse. Once you have aimed your camera, click the "+ NEW TIME-LAPSE" button to schedule your time-lapse with this view. A dialogue window will now appear.

First, give the new time-lapse a name. Then select the dates for which you would like the time-lapse to run. Setting the end date into the far future is an acceptable practice if you do not have a pre-determined end date. You can then choose whether the time-lapse should capture images once per day or multiple times per day. The most common choice is multiple times per day, at 15 minute intervals. Just click "Create Time-Lapse" when you are done and your time-lapse will begin at the date and times you selected.
With PTZ cameras, you can repeat the entire process with different view coordinates to capture multiple simultaneous time-lapses at different points of interest.
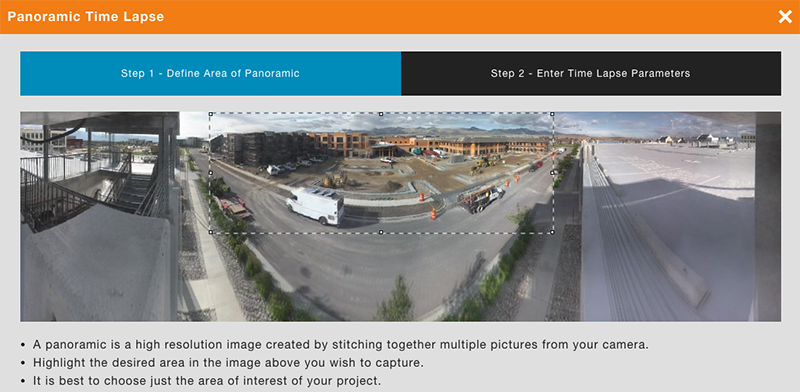
21. Panoramic Time-Lapses (PTZ Only)
A PTZ camera can create a panoramic time-lapse of a large area. The camera will automatically capture multiple pictures and then stitch them together into one high resolution panoramic image. Each camera is limited to ONE panoramic. An admin can create a panoramic time-lapse by clicking the "+ PANORAMIC" menu item.
Simply follow the wizard to define the area and schedule for your panoramic.
22. Editing Or Stopping A Time-Lapse
Admins can change a time-lapse schedule at any time. You cannot, however, change the aim and zoom coordinates of time-lapses after they are created. To edit a time-lapse, select the "Time-Lapses" menu item from the left-hand Project Menu. As an admin, you will see an "Edit" button next to each time-lapse. Clicking this button will bring up a dialogue window where you can edit your time-lapse schedules.
To pause a time-lapse, simply click the "Pause Time-Lapse" button inside this window. No more pictures will be taken until you resume the time-lapse.
To stop (complete) a time-lapse, simply set the end date as desired. When the time-lapse's scheduled end is prior to the current date and time, it is considered completed. For example, your project may have had an undetermined end date, so you set the time-lapse end date far into the future. If the project actually wrapped yesterday, simply edit the time-lapse end date to yesterday's date and it will be stopped and considered completed.
Security Video DVR
23. How DVR Works
This feature is included with all TrueLook cameras. No setup or configuration is required, although PTZ camera owners may wish to define an area of their jobsite as a security-recording preset. The camera will automatically record HD 720p video continuously. Each recorded event is listed by date, time, and duration for your review.
The camera can hold about 7 days of recorded video. Once the storage is full, the camera will continue recording new events by overwriting your earliest recordings.
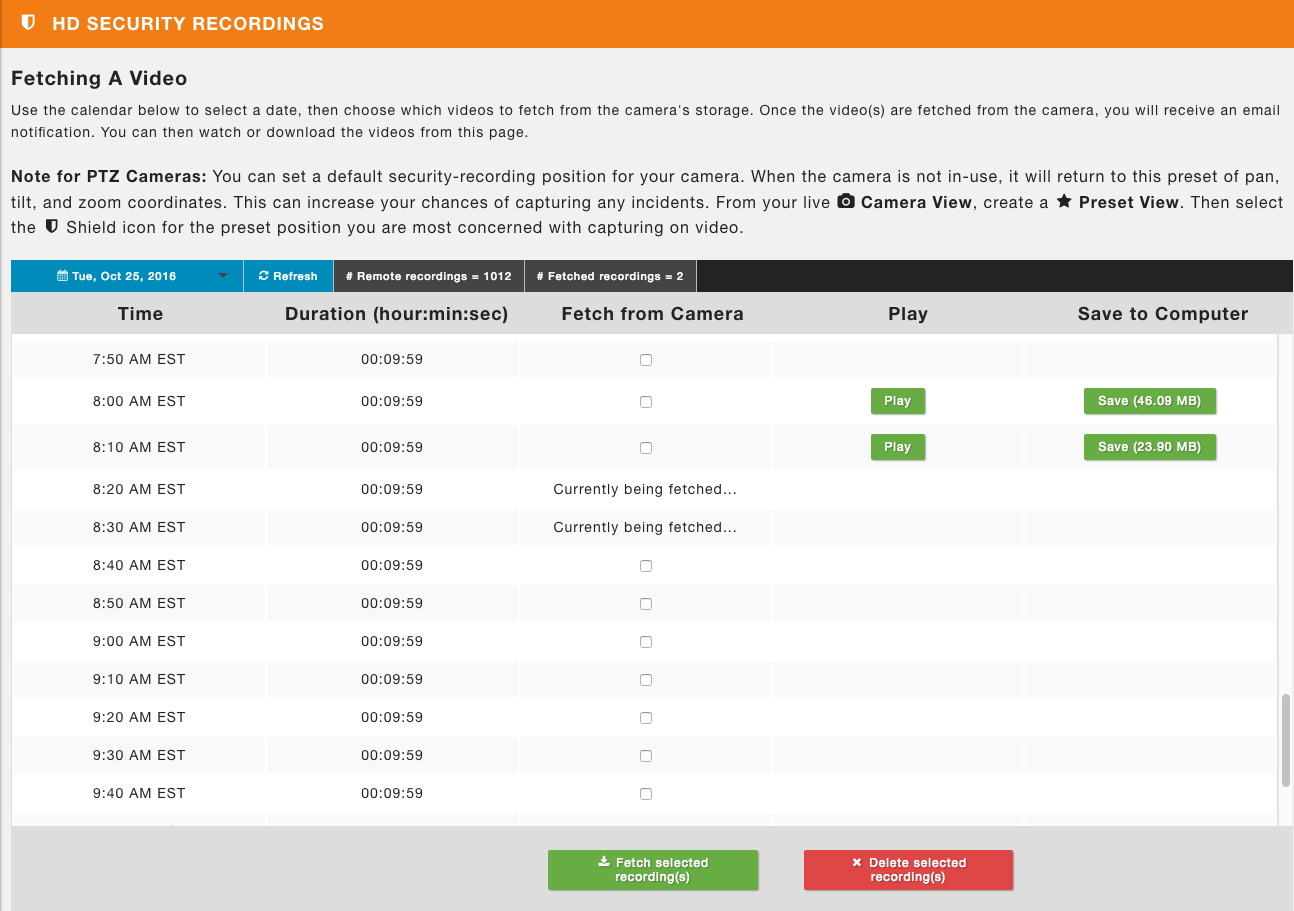
24. Retrieving A Video
Open the "Security Recordings" page to see a list of your recorded events. A dropdown calendar lets you browse past dates. To view or download a video clip, you will have to fetch it from the camera's storage. Simply select the checkbox next to any video(s) you wish to access, and then click the "Fetch selected recording(s)" button. You will receive an email when the video(s) are ready for you, but an individual clip doesn't take long. If you now refresh the video list, you will see the option to play or download your video(s).
Other Sections
25. Photo Albums
Selecting "Photo Album" from the left-hand menu will open the gallery of all photo album images. These images have been previously saved from the live camera using "Save To Photo Album". From this gallery view, admins are able to delete photos from the album. Click on any thumbnail in this gallery to access the slideshow view. In the slideshow view, you can digitally zoom for closer inspection of your images. Images can also be saved or shared, similar to sharing a live camera image.
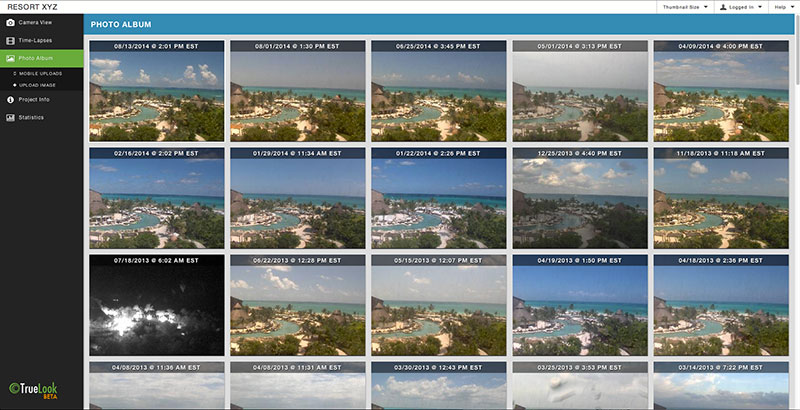

Team Members can also upload pictures from their tablet or smartphone to a separate photo album. This gives Team Members a hosted photo album for documentation pictures that are taken onsite. The "Upload Image" option is only available on smartphones and tablets, but the uploads can be viewed on any device.
Clicking the "Upload Image" button will launch a dialogue window where you can attach an image or take a new picture using your phone/tablet camera.
26. Project Info
The Project Info page shares some information about the project with camera viewers. Depending on what information the client shares, this page may give a brief overview of the project or the construction firm. The page also includes a map of the project location with live weather information and a 5 day forecast. Admins can edit this page at any time.
27. Media Export
This page allows an Admin or Team Member to download their media files. Photo album images, time-lapse videos, and time-lapse images can all be exported. TrueLook clients have access to this page forever - your data will never be deleted. This eternal archive of your project media persists even after you are no longer a TrueLook customer, so you never have to worry about losing your data.
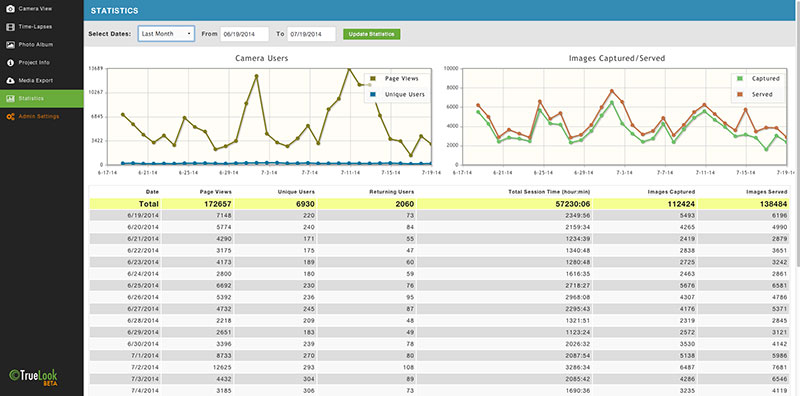
28. Statistics
Admins and Team Members can view user stats for their camera via the "Statistics" page. This is especially useful if your camera is publicly visible, and will help you determine how visitors are using your camera.
Settings
29. My User Account & Subscriptions
If you are logged in using a username and password, you will have a "My Account" menu option in the user menu (in the Global Header).
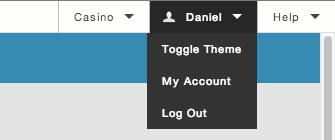
The My Account page lets you change your email address and login password. You can also set up email subscriptions for project updates or inactive camera alerts.
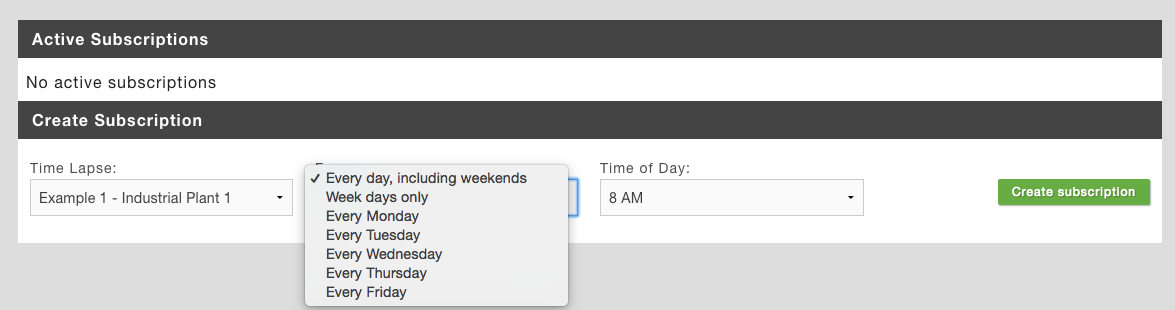
Under the Email Subscriptions tab you may select one of your active time-lapses, and then choose when you would like to receive email updates. TrueLook will use your settings to automatically email you the latest time-lapse image and info.
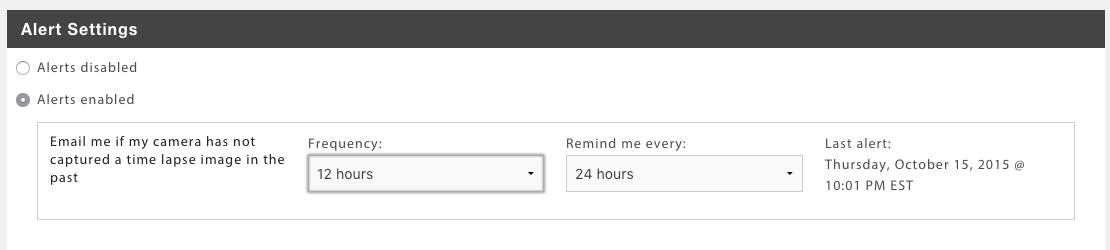
Under the Camera Alerts tab you may enable or disable inactive camera alerts. This will inform you if your camera is unable to capture time-lapse images, which may suggest a problem with the camera. Note that if you do not have any active time-lapses, the alerts will not function.
The Link Cameras tab will allow you to add additional cameras from other organizations into your dashboard. To do so, you will need the sharing link for these cameras. Simply input that information into the dialog to add them to your dashboard. This should be used for cameras that are assigned to other companies rather than others within your organization. You will not be able to have admin capabilities on linked cameras.
The Integrations tab allows you to utilize third-party services with your camera.
- LinkedIn - To post to LinkedIn, follow the integration instructions. After successfully completing the steps, you will see the "Share to LinkedIn" option appear on the sharing dialog.
- Procore - It is easy to connect your Procore account to TrueLook. This will allow you to optional save all your imagery directly in Procore and access your Procore contacts to email or invite them to TrueLook. Learn how.
- Plangrid - By connecting your TrueLook account to Plangrid, you will be able to post images to Plangrid and email/invite other Plangrid users. Learn how.
30. Admin Settings - Moderate Users
Admins can control user access to the camera. Click the "Admin Settings" menu item and select the "User Accounts" tab. Here you can view, create, and delete users. You must assign an access level for each user. There are four separate access levels, each with a unique level of privileges.
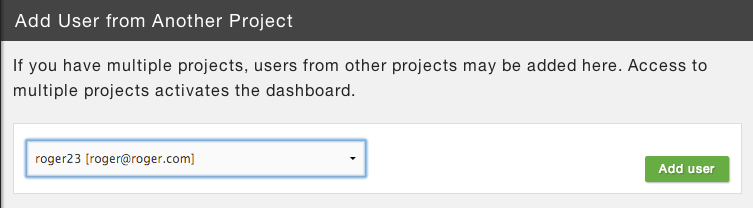
User settings are unique to each project. However, you can easily add a user from another project by selecting them from a dropdown list.
31. Admin Settings - Sharing Links
If you just want to share a camera without creating a new user, you can use the "Sharing Links" tab on the Admin Settings page. This page lets you generate and delete direct URLs to your camera. This is useful for emailing a link to a large team or sharing your camera with the public. TrueLook also lets you delete a link if you wish to direct access in the future. You can generate and delete direct links as many times as you like.
32. Admin Settings - Slideshow Mode
Also underneath the "Sharing Links" tab you will find a Slideshow Link URL. Use this to share a presentation of your project without giving access to your camera. The slideshow will cycle through various images and video sections from your project time-lapse.
33. Admin Settings - Progress Updates
TrueLook can send automated emails with images from your camera, giving you progress updates from your project. On the Admin Settings page, select the "Email Subscriptions" tab. You may add subscriptions for any email addresses you wish. Select any of your active time-lapses, customize the frequency of your emails, and select a delivery time. The emails can be unsubscribed from at any time.

34. Admin Settings - Camera Settings
Beneath the "Camera Settings" tab you will have the option to enable/disable your camera access for non-admins. Switching this to "Disabled" will block anyone (except admins) from accessing your camera.
Embed On Your Website
35. How To Embed Your Webcam
You can embed the webcam interface onto your own website to share the camera with your visitors. The interface can be embedded just about anywhere at any size on your website. To do this, first go to the "Sharing Links" tab within the Admin Settings page.
Beneath your sharing links is the html code used to embed your interface. You will need to insert one of your sharing links as the source. Copy and paste this code into your website wherever you want the interface to appear.
The interface will appear on your site with a simple, non-intrusive control scheme:
IMPORTANT: Because your embedded interface uses one of your sharing links as the source, be sure you do not delete that sharing link!
36. Embedded Interface Controls
The embedded interface uses the same controls as your full-screen interface, just in a more compact layout. Camera controls such as zooming are located in the upper-right, just like in the full-sized interface. The "menu" button will let viewers access the other features of your interface such as time-lapses and photo albums.
Troubleshooting
37. Connection Failures
As with any data service, brief connectivity issues may occur from time to time. Retry the connection or refresh the page, and most issues will resolve themselves. If the problem persists and you do not own the camera, please report the issue. If you do own the camera, ensure that the camera still has power. A breaker may have tripped or the camera may have been accidentally unplugged. For solar-power cameras, check the battery status. If you still cannot determine the cause of the problem, please contact support for assistance.
38. Grainy Or Fuzzy Images
The maximum zoom level for some cameras is produced digitally (by a magnification of pixels) rather optically (by physical lens capabilities). Extreme digital zoom levels can result in poorly resolved images. Alternatively, the camera lens or weather casing may need to be cleaned. Please email support@truelook.com so that we can notify the camera owner.
39. Poor Lighting
Outdoor cameras are subject to harsh lighting at certain times of day. However, if you notice a lighting problem, such as darkness at mid-day or constant over-exposure, please email support@truelook.com so that we can adjust the settings.
40. Contact Support
You may use the top-right "Help" dropdown menu to report any issues directly from your camera. You may also use the following contact info:
Email: support@truelook.com
Toll Free: 833.878.3566